Showing posts with label Herbs. Show all posts

Wednesday, June 11, 2014

Cucumber, garlic scapes, and dill fermented pickles recipe


Here's a very delicious fermented pickle I've had the privilege to make.  The garlic scapes are from my garden, but the cucumbers and dill are from the store.  I plan to make this again later in the year with my own cucumbers and dill, but use whole garlic instead of the scapes.  It's tasty enough, but the scapes add a special something that is really yummy.


The other day I was lamenting the price of cucumbers in the store.  It was considerably higher than normal for some reason, but fresh fruits and veg are doing this more and more frequently these days.  But I found some cucumbers that had just come in at my friends shop, and bought the lot.  They are those lovely small cucumbers, tiny little seeds, so crunchy and tender.  

A good 20 plus pounds of cucumbers plus a garden full of scapes, and a few other vegs tossed in the pot for good measure, means that I made 6 gallons worth of pickles in an afternoon.  This recipe isn't for that much, but you can easily scale it up or down to your liking.  I'll do it per pound, so per each pound of veg you add...x this and that... very simple.

My recipe is inspired from this... okay, it's basically the same only modified for the open vat ferment style instead of the small jar ferment style.  Very good recipe, but far too small an amount for how good it tastes.  The ratio of dill, garlic and cucs is up to you entirely.  If you want pickled garlic with a hint of cucumbers, do that, if you like cucumbers best, do mostly those.  If dill drives you crazy with love and passion, go nuts.  But basically, I tend for 10 to 50 garlic scapes per pound of cucs, or one bulb of garlic for 2 pounds of cucs - I love garlic.


Cucumber and Garlic Scapes Dill Pickles


  • cucumbers
  • garlic or garlic scapes or both
  • fresh or dry dill.
  • salt
  • optional - chili pepper, other veg like carrots
  • water
  1. Weigh out the veg.  For every pound of veg put aside 2 tsp of salt.  Add one Tbs of salt to the pile (for the pot as they say).  
  2. Cut up the veg how you like.  The more surface area the faster they will ferment.
  3. Layer it in a clean crock (no antibacterial soap, this will kill the bacteria that we need to ferment the pickle), layer of veg, sprinkle herb, layer garlic, layer of salt, layer of veg... and so on.  Save a good Tbs of salt for the top.  When you run out of veg, sprinkle the rest of the salt on top.
  4. Put a plate or cut a piece of plastic or wood or whatever you have on top of the veg/salt layers.  It needs to be smaller than the opening so it can weigh down the pickles, but not too much smaller that the veg can get around the inner lid and float.  Weigh it down with a jar of water or clean rock, or the like.
  5. cover the whole thing with a cotton or linen cloth to keep the bugs out and stop the dust getting in.
  6. Place somewhere at cool room temp, between 10 and 20 C is ideal and ignore it for 12 to 24 hours.
  7. The veggies will make their own liquid, but probably not enough.  Add clear, clean water to the vat until the veggies are submerged.  Cover it back up and ignore it.  
  8. After three days to a week, open up the vat and take out a few cucumbers (with clean hands/tools) to taste.  If you like it, put the pickles in jars in the fridge.  If you would like it more sour, replace the inner lid and weight to make certain everything is submerged.  Cover again with cloth and ignore for another week.
There may be mold.  It happens but is seldom harmful.  If the mold is black or the vat smells rotten - toss it it the compost immediately!  Otherwise, trust your senses to tell you if it's okay to eat or not.  Mold isn't always bad for you.  In fact, a great number of molds are good - antibiotics come from mold, blue cheese, miso soup, sake rice wine... all contain friendly molds.  Most molds don't care about humans one way or the other, some are helpful and some are harmful.  But the point is, not all molds are bad.  If you feel uncomfortable with mold, then don't eat the vat.  If you don't mind it, and it's not black mold, then scrape off the mold, maybe sprinkle some more salt, and make certain everything is submerged below the water.

If you are making this in the heat of the summer, which is likely given the way cucumbers grow, and don't want to eat it right away, then feel free to add more salt.  In the summer, I usually put in 1Tbs salt per pound of veg.  In the winter, when it's cool, I'll add a lot less salt, maybe 1 tsp per pound of veg (this is my basic guide for all vegi ferments like kimchi or sauerkraut).  


You can make these pickles for the flavour, or to preserve the cucumbers or for the health benefits of probiotics.  I find this recipe very affordable, especially when my own cucumbers are in full production... although if you are buying the cucs, then maybe wait for them to be on sale.  

This is a traditional method to preserve cucumbers, and also one very good for transitioning away from dependence on big business and long range food transport.  Make this in the summer when you have cucumbers coming out your ears, then you will be able to enjoy pickles well into the winter, maybe even next spring.  For preservation, it's helpful to keep it in a cooler location.


Yes, this is vegan friendly.


Tuesday, June 25, 2013

Harvest and making random things

Time time of year my focus is more on outside the house than inside the kitchen.  The garden needs constant attention, the animals and...well everything.  But I still get a bit of time to cook what we harvest.

Calendula and sage for the dehydrator.  The sage is for tea and cooking, whereas I hope to have enough flowers by fall to make a dye bath for some fabric.  


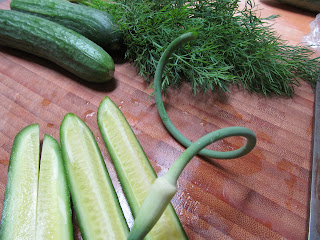
Also in the photo are garlic scapes.  I never brought these into the kitchen before, so I really had no idea what to do with them.


I decided to try (a slightly altered) version of these cucumber pickles.  The ingredients are almost the same, but I used a different method for fermenting them.  Although it's going to be difficult improving on this already fantastic recipe, I plan to spend much of the summer attempting variations.


With a proper cellar I could see this being a great way to preserve cucumbers and other veg.  It was magical as the taste of the cumber went from salty to sour in just a few days.


I've also been harvesting several wild plants (aka weeds, of which we have many this year) for eating and medicinal use.  This is chickweed:


I used it to make a hand salve for a friend with some rather impressive skin troubles.  Chickweed has worked in the past for him, so I'm curious if my standard salve preparation would do the trick as well.

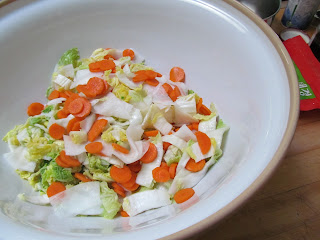
And finally, what would summer be without a pot of Kimchi on the go?

Daikon, carrots and su choi make up the bulk of this batch.  I chopped up some garlic scapes extra fine and tossed them in as well.  Very tasty.  Used the recipe from the book, Wild Fermentation - well more or less.

Monday, December 24, 2012

Recipe for homemade herbal hand cream

Homemade hand cream, what a good idea for a quick last minute Holiday gift for a very good friend of mine.


I've been making this natural and mild hand cream for years now.  It is excellent for dry, dishwashing hands and most skin conditions, especially those caused by allergies.  I call it mild because it has almost no smell, but it is hard working.  It even has some antiseptic qualities to it which can help wounds heal faster (don't apply to open wounds, just ones that have scabbed over) and prevent scarring.

I used some herbs I collected from the garden over the summer and dried on a baking tray in the shade, you can choose your own combination of herbs, or even use none at all.  Rosemary works well for dry, flaky skin.  Calendual has magic skin healing qualities, so do roses and lavender, well that just smells nice and felt right.

This recipe makes quite a bit, enough for 4 of your friends and 4 months use for yourself.  Please use it within a year of making.

Homemade Herbal Hand Cream

1 and 1/2 cup olive oil
1/2 cup bees wax (when melted)
1/2 cup coconut oil
1 tsp honey
1 tsp castor oil (optional, but helps to draw out toxins from the skin)
small handful of dry herbs (I used calendula, rose petals and lavender)

Raid the recycling bin for a few old (heat friendly) glass jars and clean them out really well.  Also, at this stage it's a good idea to get your tins and jars ready for the finished lotion.    Something wide mouthed with a lid works great.  Altoids tins don't work all that well due to the holes where the hinge goes.

Everything, jars, final tins, everything needs to be dry before you start.


In your largest jar (I used a cheeze wiz jar that the Ancient had finished with) put the olive oil and herbs.  Save a few perfect looking herbs for decorating the finished lotion.  Place the jar in a pot and fill the pot with warm water so that it is just about the same level as the oil, maybe a bit higher.  This makes a poor mans double boiler.  Place the pot on medium heat.


In the smaller jar, place some chopped up beeswax and place this jar in the water next to the oil and herb jar.

When the beeswax is melted, you can turn down the heat and start straining the herbs from the oil.  If you don't get them all out right away, don't worry, you can strain it again when you fill the pots.


Combine about 1/2 cup of coconut oil to the olive oil.  Feel free to bring up the heat again at this point.  When the coconut oil is completely melted, CAREFULLY poor about 1/2 cup of melted beeswax into the oil.  Mix it all together and test the consistency by dripping a few drops onto a tin, letting it cool, and feeling how creamy it is.


If it's too solid, add more oil, if it's too liquid, add more melted beeswax.

Make certain you have the honey and castor oil right ready.

Remove the jar from the water, and very quickly add honey and castor oil to the lotion, sir very well.  Poor through a strainer into the jars.


Leave it somewhere with the lid off where it won't be disturbed until it starts to go creamy and the top just starts to solidify.


Place the remaining herbs on top of the lotion, and press gently with your finger.


Infusing the herbs into the oil like this gives a very mild scent but also helps impart some of the healing qualities in the herbs into your hand cream.

You can add essential oils to the cream at the same time as the castor oil, but I don't recommend it.  Essential oils can be as harmful as they are helpful, and if you are making this for someone with skin troubles, it is best to keep things as gentle as possible.


Correction, this is NOT vegan friendly due to the beeswax and honey, but it is suitable for most vegetarians  and will work well for most people with Allergies.  If you are giving it away, make sure you include an ingredients list.


Tuesday, August 14, 2012

How to harvest poppy seeds

I love poppies in the garden, their fleeting flashes of colour, their rich history of illicit substances, the memories of post battle fields filled with bright red flowers.  There is a great deal of history, both joyful and painful, that surrounds this simple flower.

Aside from the 'special' substances that can be derived from their juices, poppies are more commonly known for their seeds.  You can make so many different things with these seeds, from pasta sauce to bagels from these charcoal dots.  

This year I grew bread poppies.  They have pink flowers and are known for their large pods packed full of seeds.

Pick the pods by cutting a couple of inches down the stems.  Do this at the heat of the day and only pick the dry ones that rattle when you shake them.


Cut the tops off the seed pod with some sheers.  Do not use sewing sheers for this, it will dull them and people might yell at you.

You can see the compartment where the seeds live.  Now up end this in a shallow dish, carefully picking out any bits of pod that fall in.


Leave it to dry a few days, gently stirring every day.  Store in an air tight container for future use.